Stock Photo Gallery

Saturday, October 22, 2011


Studio shot of white and pink flowers with a two light set by Nicola Zingarelli
Flowers make for beautiful and very patient subject for your studio photo sessions. They don't move and have that inner (and outer) beauty that just need a bit of sensibility to come out and fill the frame. Thing is that I’m not a flower photographer, at least not one of those that ravenously search fields and botanical gardens, I’m rather one of those that when there’s a flower at home grabs it and put it in front of the camera. I’m also the one who usually brings the floral gifts so at least I can pick those I think can make a nice subject too. 
Photographing flowers for me means soft light, soft images, and mostly a low key shot, well at least now, maybe tomorrow I’ll go hard and high key, truly don’t know… My set for this session was based in two lights, one for the flower and the other for the background. I didn’t use any reflector pursuing my quest of a light gradually fading and leaving an area into a certain degree of darkness. The light for the background carried a blue gel, in order to create a color contrast with the subject and also because I love blue background, they’re way classy!

The main light for all shots was one of my SB800 through a Lastolite EzyBox on camera left, while the other SB800 was gridded with a Honlphoto grid pointing at the black background. For each one of these three shots I was looking for something different and I hope it shows. Details, lighting, point of view and depth of field and of course, there has been a bit of work in Lightroom to come up with the final image. Water spray was used to enhance reflections and textures in a couple of flowers, and I think it is a good plus. Hope you like them, if you need any further information please drop a comment

Saturday, October 15, 2011

Lures diving in the water, studio shot with two lights on a blackbackground


Lure diving in the water, studio shot with two lights on a black background by Nicola Zingarelli
Yesterday a friend showed me an image of a lure swimming in the water on a black background. This was some sort of relief because when I did my first test, I had to quit the idea of using a black background because reflections flare and light spills were everywhere. So yesterday, with renewed energies I set up my studio and the first thing I did, in addiction of putting my black vinyl background, was to cover 2 sides of the tank with black cardboard.
I also got rid of the large lights, any umbrella or softbox would send too much light out of control so I decided to go hard and small. One SB800 was set with its dome and the other with a Honlphoto Grid one of each of the narrow side of the tank, power settings changed a lot during the session so is hard to tell which has been the most commonly used. I also switched the main light from one speedlight to the other, again hard to tell some sort of rules.
Once everything was set the first test shots were suggesting a decently dark background that could be easily manipulated in Lightroom, giving me the proper black I needed. Now I needed to find a way to focus on the lures, so I put one in the middle of the tank, same distance from the two longest walls, and hoped for the best. I obviously took the focus with the lure under the water, I have read somewhere that the liquid element not only increase the magnification of the objects but also swift the focus point.
Since I was on my own I needed something that could help me moving the lures, for this reason I tied them to a thin fishing line of the length of the longest side, with a weight on the other end. I could pull the lure to one end of the tank, the weight would lift up to the opposite edge and once I released the lure the weight would pull it to the other side … gravity!
I shot with the camera parallel to the wall of the tank, with a bit of angle from above, a pretty high angle, and a very low one and achieved different results. Parallel or with a small angle worked fine, the images are sharp when the focus is on the money, but from a very high or very low angle, like in this image, sharpness and focus became an issue and I believe that is because of the thickness of the glass, that would create refraction and a bit of distortion. I’m not an expert on this matter but I believe I’m not far from the scientific explanation.
I made so many shots that my D7000 was smoking, well at least it was very hot and sometimes needed a break to process the files. The SB800 showed how good they are for the hard work, not a single complain, never stopped, always recycling fast and with just one set of batteries. Some intensive processing in Lightroom followed, I needed the blacks to be black, and the lures to be sharp and well exposed. It has sure been a challenging experience, I have made an unlimited number of mistakes and probably none of the images is really good, but it has been my first step, hopefully I’ll do it better next time.

Wednesday, October 12, 2011

Fishermen ... and friends! Small group portrait shot in Green Harbour, Massachussets

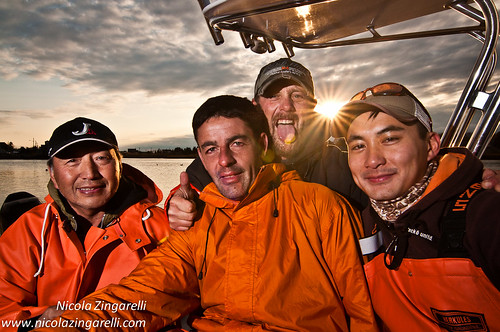
This is one of those shots you keep in your library for a while, until you realize that is something you really like. I do love it, as simple as that, I think is really good, and even if is not humble or politically correct to say that you like something you have done, I don't care, I honestly believe is a good shot. It's got the colors, orange is a great to have in a photo, it's got the sunstar sneaking between two of the guys, which is, let me say it, way cool, and it's got a decent light on the subjectsagainst the backlit sunset. It took me a century to be able to focus on these guys because of the sun sneaking in, but I think it was 100% worth it. Figure this out, even my buddies were having fun !

Monday, October 10, 2011

Molix Vario lure shot in a tank with splashing water and two lights

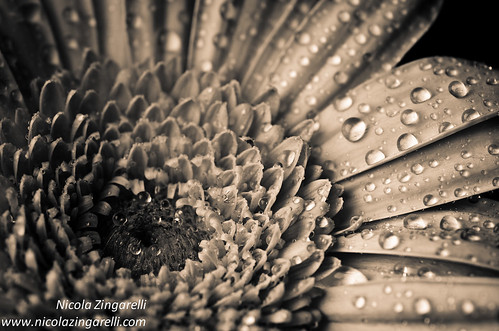
Yesterday, strongly pushed by my 7 years old daughter I finally filled up the fish tank and set my home studio. I really wanted to try to make the photos that I have seen done by other guys in Flickr, so I did. First mistake was to try using a black background, is my favorite but I soon discovered that with the set up I was using wouldn't work. The tank was reflecting everything like a mirror and couldn't get a decent transparent view of the glass. Off the black goes, in the white comes: problem solved.

Once I had everything settled I soon found myself looking around for something that would keep the front glass of the fish tank clean from the water drops. It is ridiculous because every time you drop the lure it would splash it again, but it felt more professional doing so.

I had two lights, both SB800 triggered with Nikon CLS; one on the left side through a transparent umbrella at the same height of the water surface, the other on camera right through another umbrella, facing down to the tank slightly angled to the background. The left speedlights was in charge of the main light and the right one would also take care of the background, trying to keep it as white as possible. Thinking it back, I believe that next time I will change this light setting, more in another post.

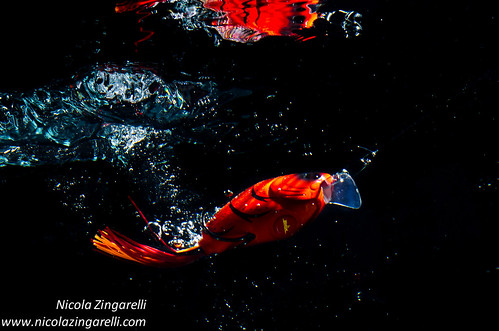
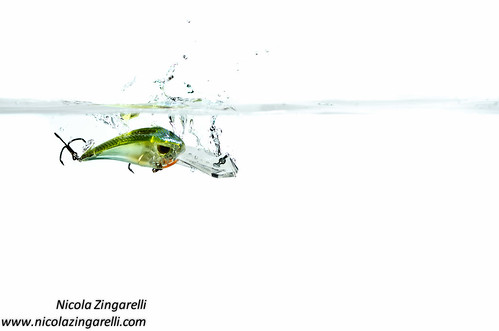
I tied a thin fluorocarbon trace to the upper section of a fishing rod and the lure on the other end, handed to my daughter and with the lure sitting in the middle of the tank I manually focused at that distance with a Nikkor 60mm f2.8 Micro and the D7000 on a tripod.

Then we started shooting, first with my daughter working the lure, until I decided to make a change, and put her at the shutter button, and me at the rod. This worked way better because I could tell her when to press the button and I could play the lure the way I knew it would have worked better.

We worked with 4 different lures, for at least a couple of hours, deleted at least 70% of the takes and saved the decent ones. Another good hour was needed in Lightroom to clean up things.
The result is in front of you, far from being perfect yet is a start, I have learn few important things and most of all, I have found another way to enjoy my studio work, which I love.

Tuesday, October 4, 2011

Orbis Ring Flash for macro shots

The guys at Orbis Ring Flash have been so kind to post an article about my product photos using the Orbis Ring Flash, you can find it by clicking here

Thanks!